Featured Brands
Recommended Products
Changing a bike tire is a beneficial skill that, as a cyclist, is handy to know. It might seem pretty straightforward, but you can make it very easy or very difficult for yourself if you don’t know how to do it properly. In this article, we will tell you everything you need to know about how to change a bike tire, replace a bike tire, and even replace a bike tube.
For a bike tire replacement, check out our full selection of bike tires. Before we start, the first thing we need to think about is what tools and spares we will need. We highly recommend having these at your disposal;
The first thing you are going to do is remove the wheel. Depending on where you are, you can either turn the bike upside down, lean it on its side, or get it into a stand. Typically you have two different types of skewer which hold the wheel on, a quick release and a thru-axle. Both of these you will need to release and unscrew.
Once removed, your wheel will come out, and you will be able to work on it. A top tip if you have hydraulic disc brakes, ensure that the lever is not pressed with the wheel out as this will cause the pistons to adjust.
Now, you'll want to deflate the tire, ready for removal completely. You can do this by removing the cap and either unscrewing the Presta valve and pushing the pin or just pushing the pin on the Schrader valve. Once deflated, push the tire's bead inwards to loosen it off the rim.
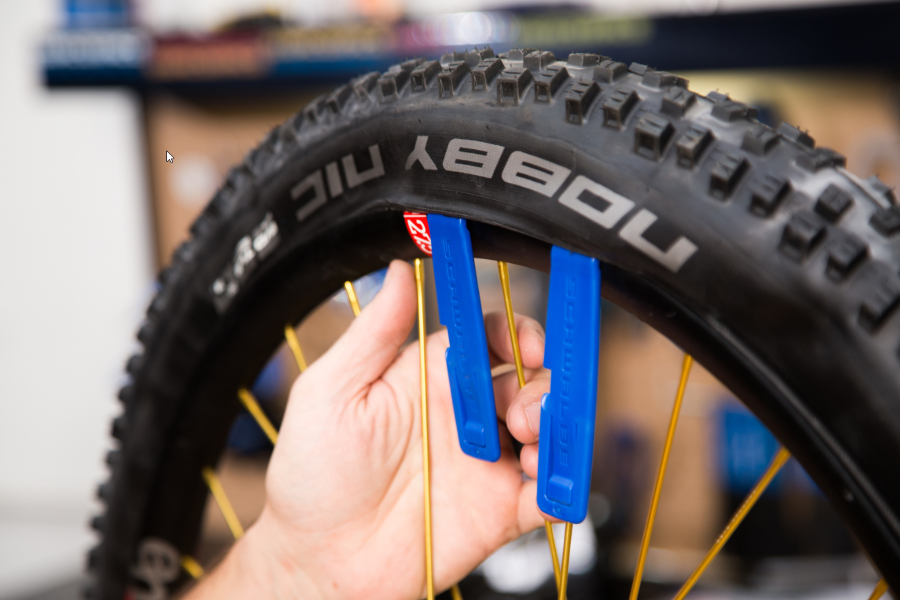
Now you will want to take your tire lever, insert it under a part of the tire, slowly ease the tire off the rim, and be careful not to snag the inner tube. If you are using tubeless, you might want to put a rag inside to soak up any old sealant, or it might get messy. Once one side is off, you should be able to pull the tire straight off with the inner tube.

Now you have the tire off and the wheel free, you will want to inspect it to ensure that it is in good working order. Check the wheel is straight and true by spinning it in your hand and holding on to the hub. Then make sure there are no cracks near any of the spoke holes. Once you have done this, ensure that the rim tape is in good condition and covers all the spoke holes. If you’re using tubeless, you are doing to give this a big clean and remove any excess sealant.
If you are swapping the tire out because of a puncture, you will need to inspect the tire to ensure the thorn or piece of flint is gone. Then you will need to either swap the tube out or even patch the old one. You can do this by finding the hole, scratching it clear, and sticking a patch on it. We recommend changing a tube instead of patching.
Shop Bike Tubes and Tubeless Kits | Shop Bike Tire Repair Patch Kits
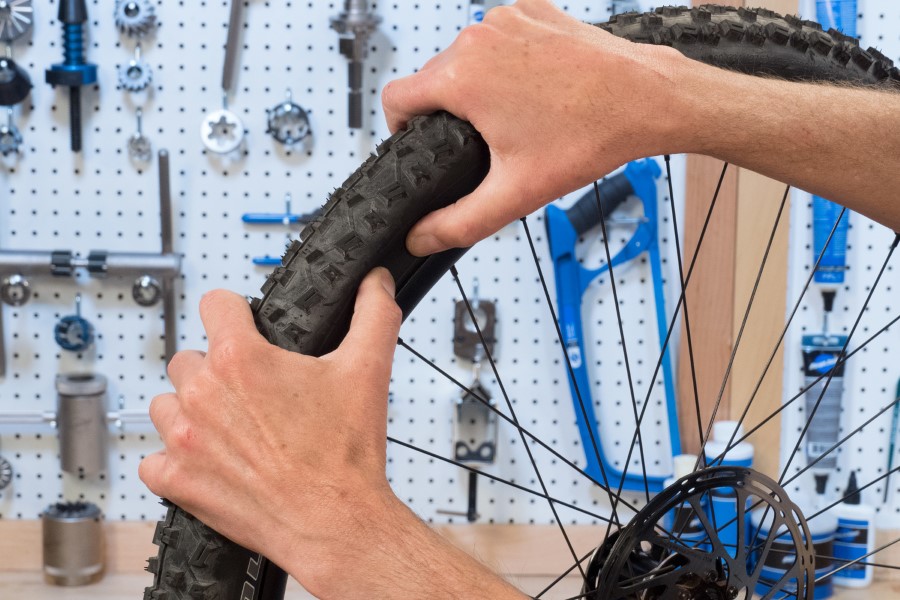
How to put a tire back on the rim? Firstly check the rotation of the side of the tire to ensure it’s going correctly. Start by running one side of the tire into the inside of the wheel and then insert either the inner tube into the tire with it partially inflated to make sure it doesn’t nip. If you are using sealant, you can insert it here or later into the valve.
After this is complete, you will need to pump the new tire up to the recommended PSI. If you are unsure, check the manufacturer's recommendations, but whatever you do, don’t go over the maximum stated on the tire or have it too low that the tire is very spongy. Now make sure the tire is on correctly and is in the bead. You can check this by spinning the tire to ensure it's not lumpy. If it is, push the side of the tire up onto the bead with your fingers carefully.
Now it’s time to reinsert the wheel. You will need to pop the wheel back and ensure it is in the correct place. If you have removed the rear wheel, check that the chain runs correctly. Tighten up the quick release or thru-axle to the proper tightness. Now it’s time to get the bike on the floor. Check the brakes work and that the wheel is tight.
The process is the same for any tire. Generally, the larger the tire, the easier the process. Road bike tires can be challenging and might need a little more attention. For more information on types of tires, check out these pages Link to dirt mountain bike tires, road bike tires, gravel bike tires, and cyclocross bike tires.
Firstly you have the cost of the inner tube, sealant, and tires. If you get a tire replaced at a bike shop, they will charge anywhere from roughly $10 to $20 for labor on a tire with an inner tube. For tubeless, it could be $20 to $30 as the process is much more complicated and takes longer.
If they look worn and have a lot of small slices or are giving you a lot of punctures, they will need changing. Depending on the tire, they might give you 5000 miles or 500 miles depending on the discipline and quality of the tire.
They can be as cheap as $20 or as expensive as $100. It depends on puncture protection, the tire's weight, and performance.
Some of the top current brands are Continental, Vittoria, Specialized, Maxxis and Schwalbe
It will take time to replace a bike tire, but the more you do it the quicker you will get. Replacing tubes and tires is a great skill to learn and will help you while riding out on the road.

SHOP NOW

SHIP ALMOST ANYTHING & SAVE

SHOP NOW

SHOP NOW

SHOP NOW


Follow Jensonusa